
Using the TUI
The TUI is the recommended way to use Octez Manager. It provides an intuitive interface for installing services, monitoring their status, and managing your infrastructure — no memorizing commands required.
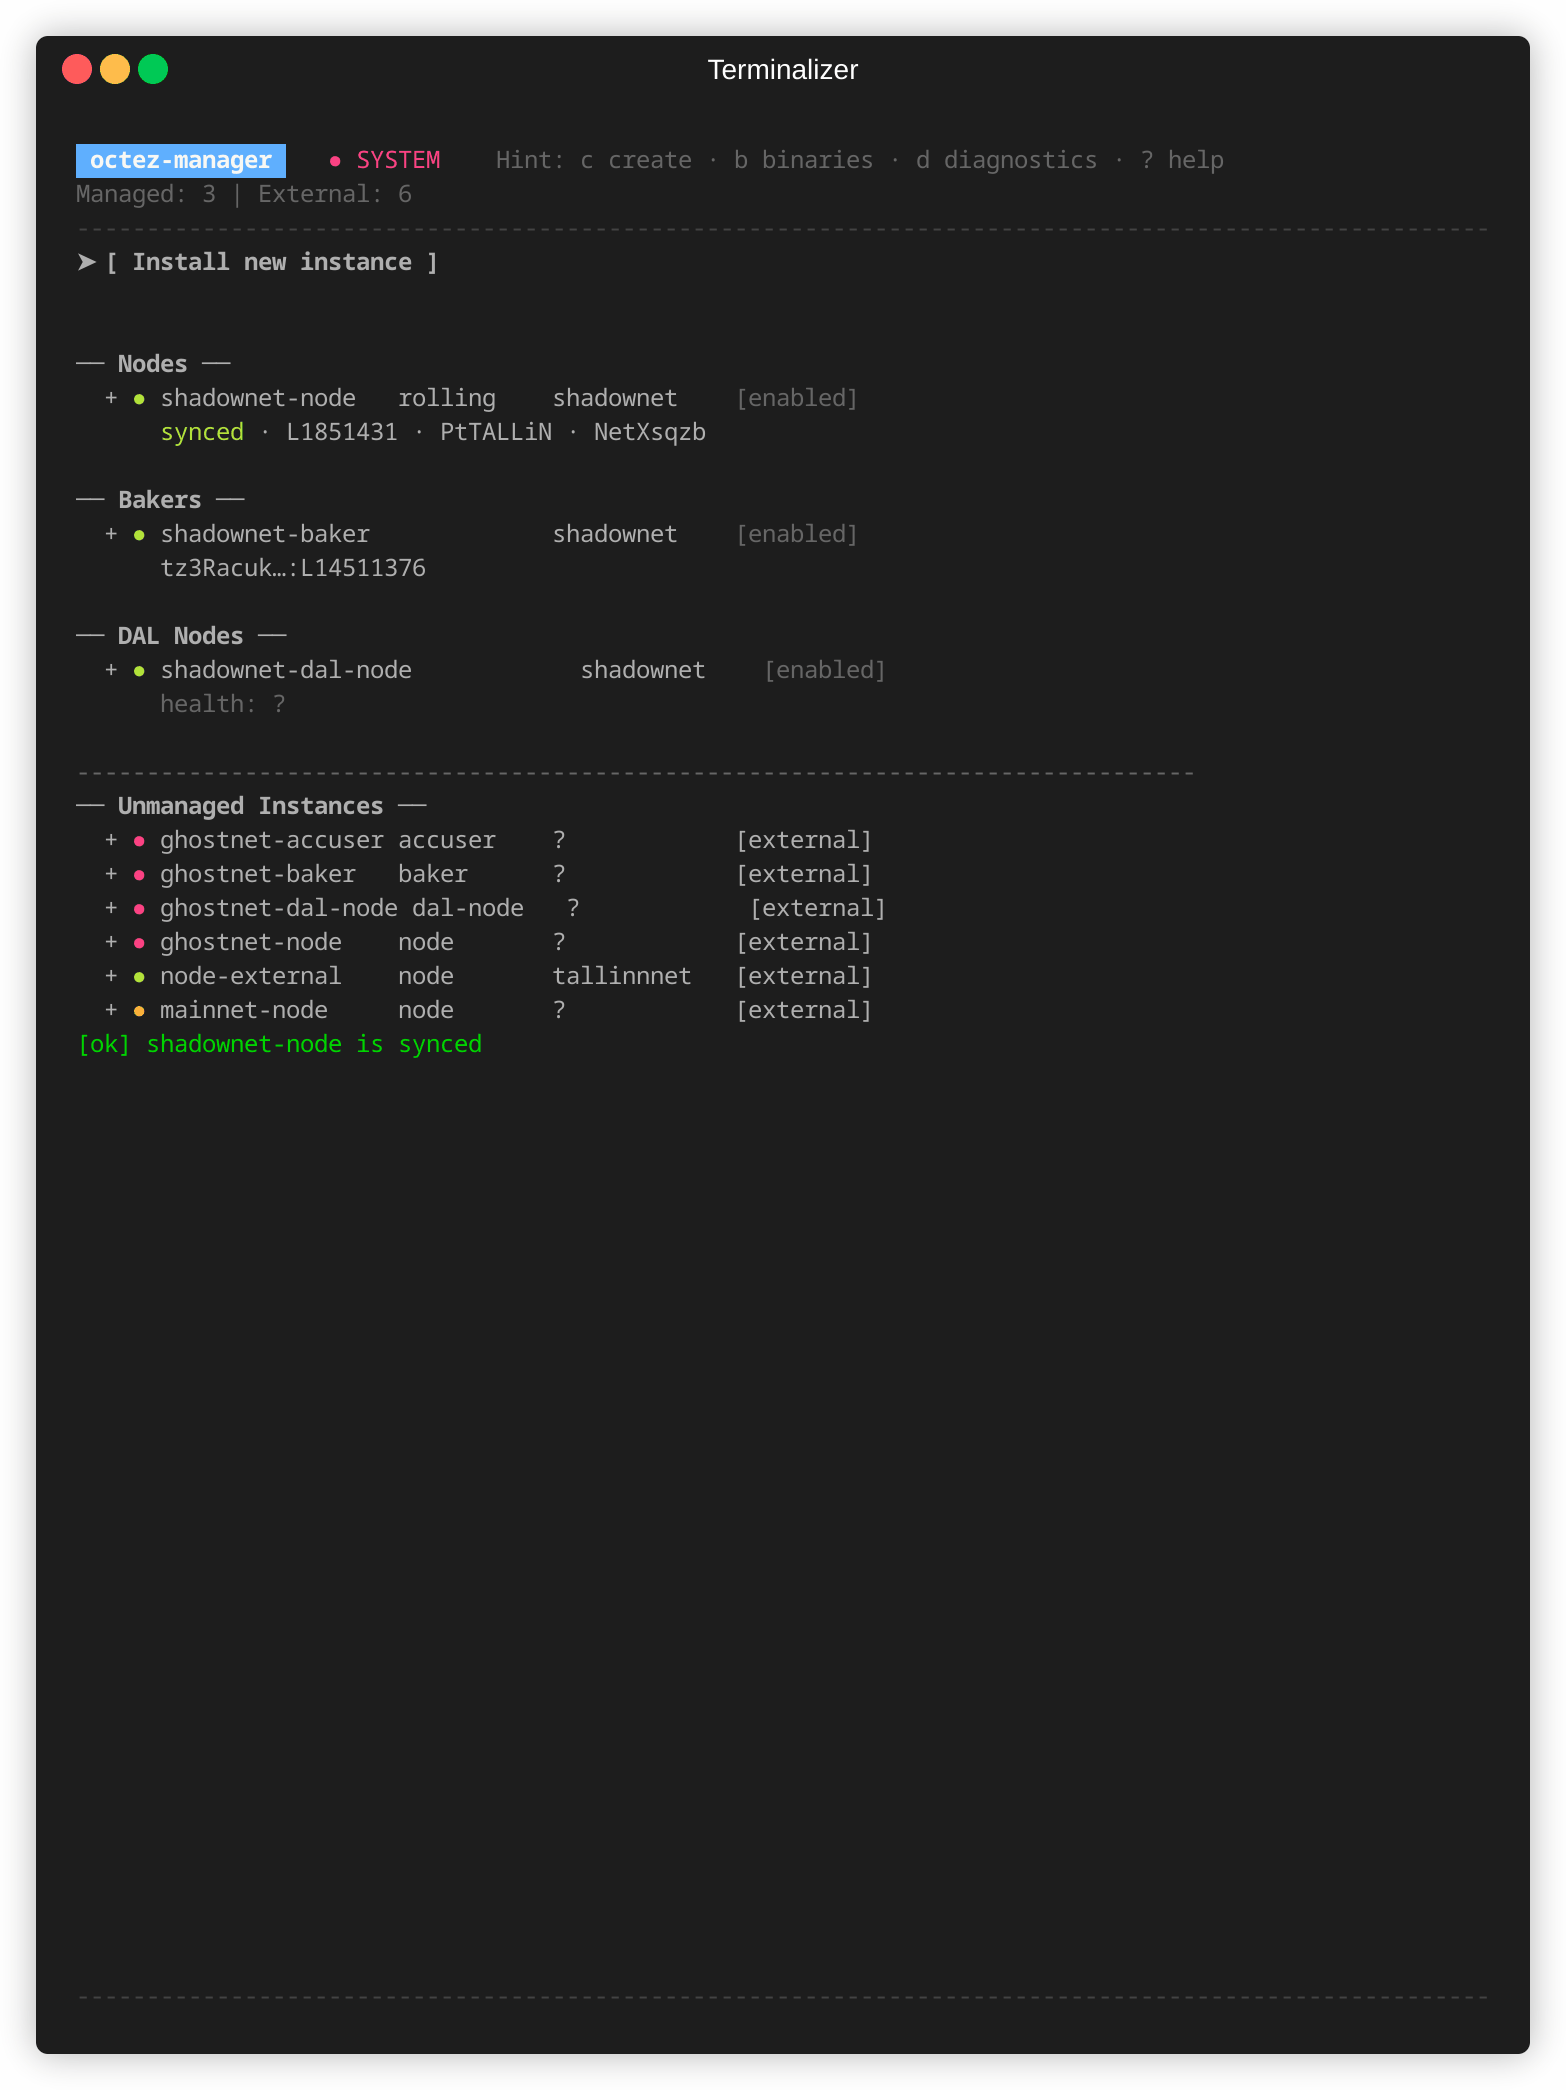
This guide walks through common workflows using Shadownet as an example.
Tip: Press
?at any time to see available actions for the current screen.
Remote access: For browser-based access, see Web Interface.
Getting Started
Section titled “Getting Started”Launch the TUI:
# User mode (services run as your user)octez-manager
# System mode (dedicated service users, production)sudo octez-manager
Note: User mode and system mode are independent. Instances created in one mode are not visible in the other.
What You Can Do
Section titled “What You Can Do”The TUI provides access to all Octez Manager features:
| Feature | Description | Key |
|---|---|---|
| Install services | Deploy nodes, bakers, accusers, and DAL nodes | Enter on Install |
| Monitor status | Real-time service status, sync progress, delegate activity | - |
| View logs | Live log streaming with search and filtering | Enter on instance then select logs |
| Control services | Start, stop, restart, and remove instances | Enter |
| Manage binaries | Download and manage Octez versions | b |
| Import services | Bring external services under management | Enter on unmanaged |
Installing Your First Node
Section titled “Installing Your First Node”From the main screen, select [ Install new instance ] and choose Node.
The installation wizard guides you through:
- Instance name — A unique identifier (e.g.,
shadownet) - Network — Select
shadownetfor testing - History mode —
rollingis recommended for most users - Binary selection — Choose from managed versions, registered directories, or custom path
- RPC/Net addresses — Keep defaults unless you need specific ports
- Bootstrap method —
Snapshotdownloads pre-built state (faster)
Once installed, the node appears on your dashboard and begins syncing.
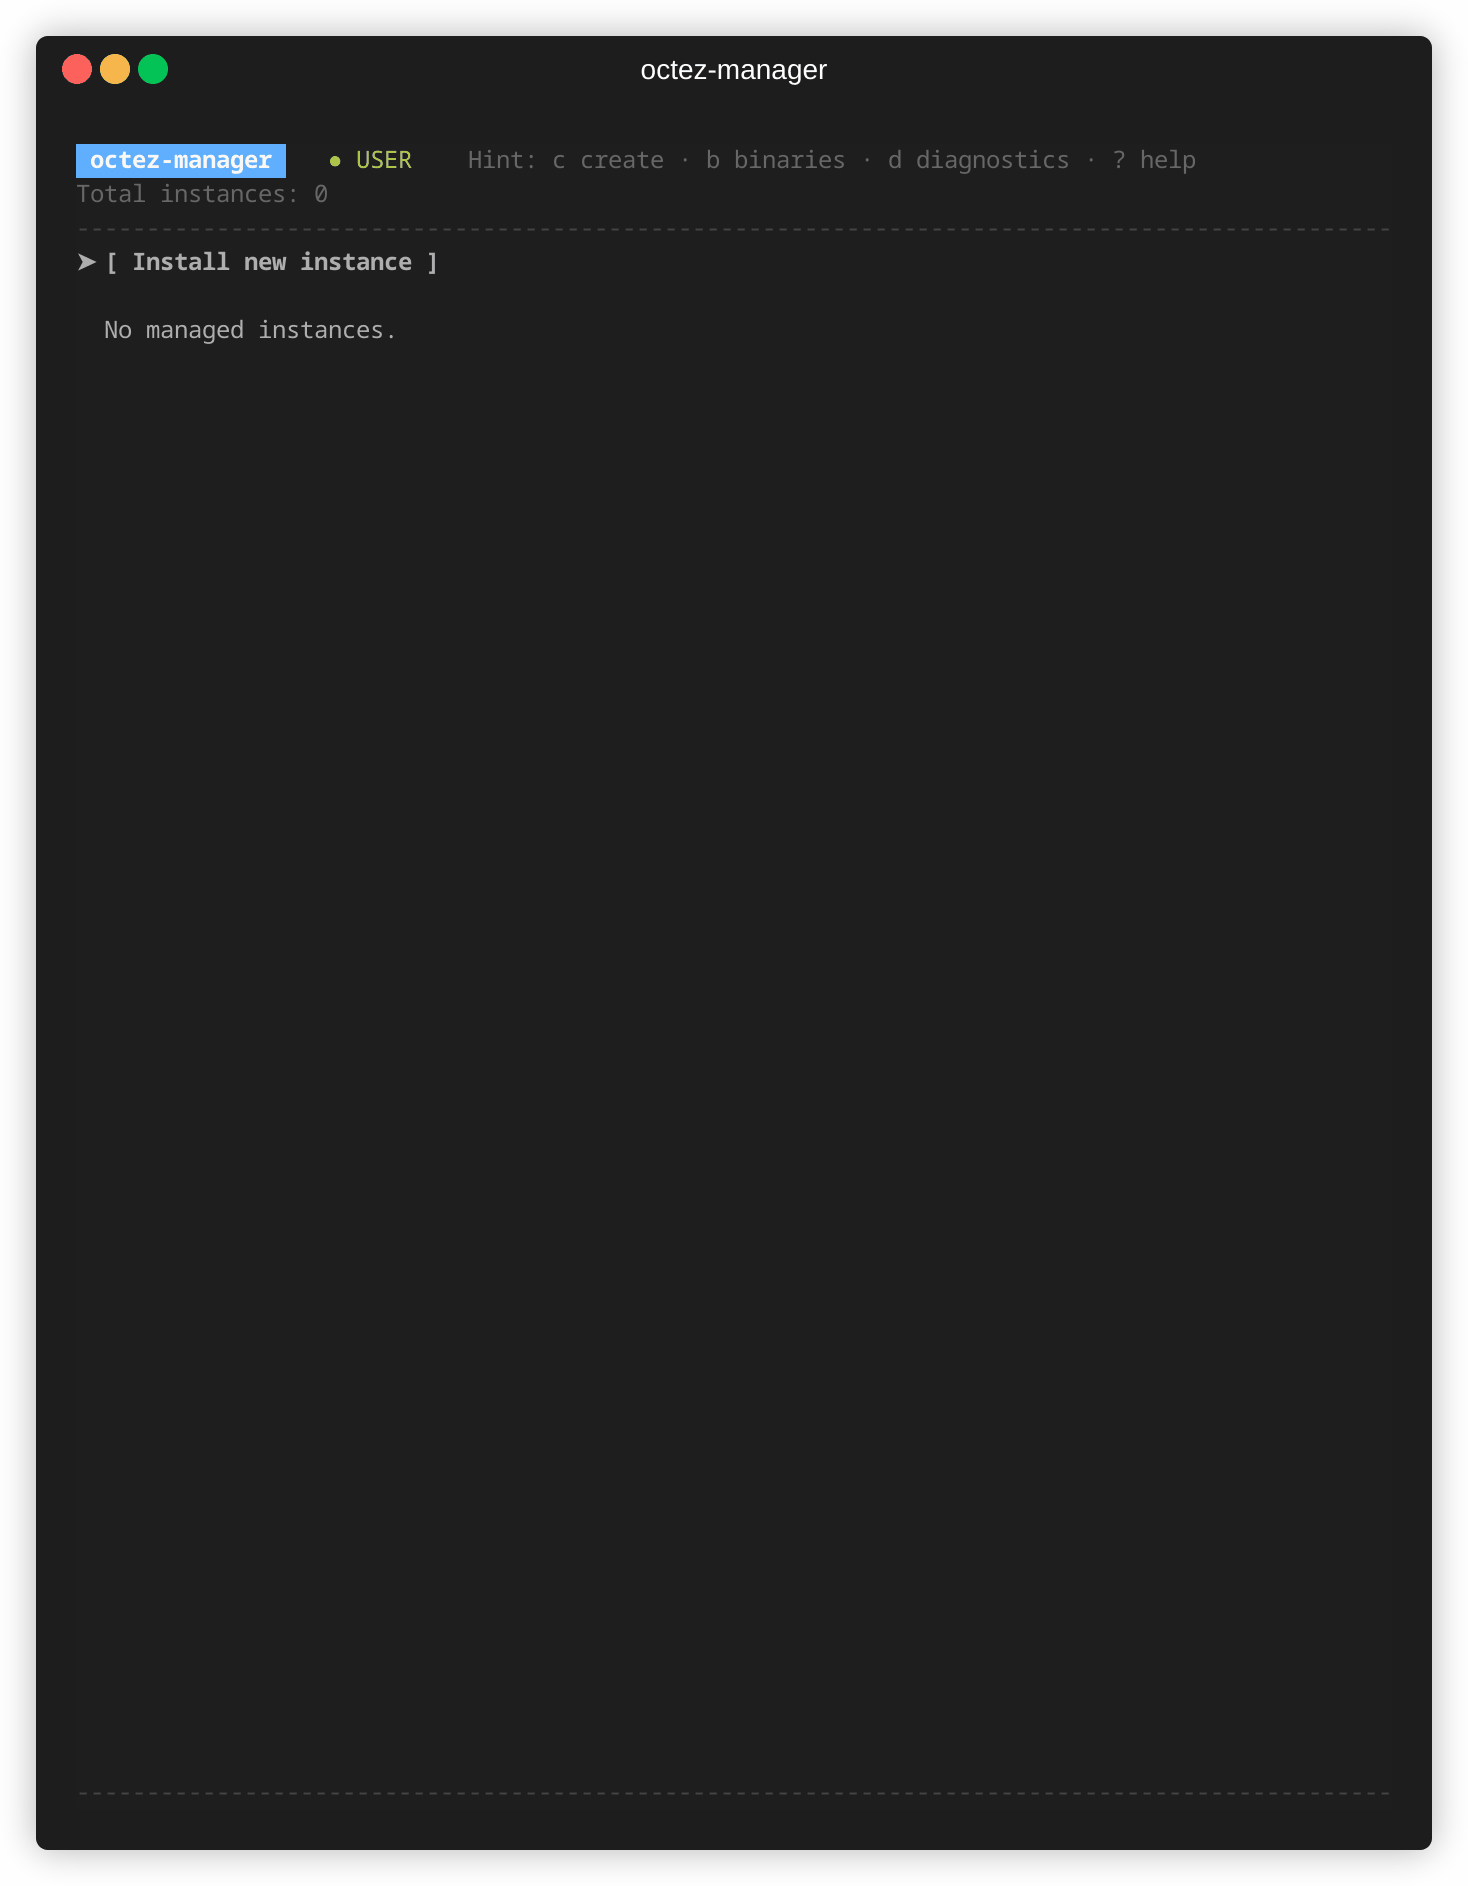
The Main Dashboard
Section titled “The Main Dashboard”The dashboard shows all your instances organized by type:
- Nodes — L1 blockchain nodes
- Bakers — Block producers and attesters
- Accusers — Double-baking detectors
- DAL Nodes — Data Availability Layer nodes
- Unmanaged Instances — External services detected on your system
Each instance displays:
- Status indicator
- Instance name and network
- Real-time metrics
Select any instance with arrow keys and press Enter to see details, or use the action keys shown at the bottom of the screen.
Upgrade Notification
Section titled “Upgrade Notification”When a new version of octez-manager is available, an [ Upgrade octez-manager → vX.X ] button appears at the top of the dashboard. Select it and press Enter to upgrade.
Adding a Baker
Section titled “Adding a Baker”After your node is synced, you can add a baker. Select [ Install new instance ] → Baker.
The wizard will:
- Ask which node to connect to (select your Shadownet node)
- Auto-suggest a name like
baker-shadownet - Prompt for delegate addresses (your baker keys)
- Configure liquidity baking vote and DAL settings
Updating Service Versions
Section titled “Updating Service Versions”To change the Octez version used by a service:
- Select the instance and press
Enter - Choose Update Version from the menu
- Select a new version from the list (managed versions, registered directories, or custom path)
Managing Binaries
Section titled “Managing Binaries”Press b from the main dashboard to open the Binaries page.
From here you can:
- Download official Octez releases from GitLab
- Register custom build directories (e.g., dev builds)
- Remove specific versions
- Prune all unused versions (shows disk space to be freed)
Downloaded binaries are stored in:
- User mode:
~/.local/share/octez-manager/binaries/ - System mode:
/var/lib/octez-manager/binaries/
When installing or editing services, you can select from your managed versions in the binary selection step.
Viewing Logs
Section titled “Viewing Logs”Select an instance and press Enter, then choose the logs option:
- Logs stream in real-time (follow mode)
- Press
/to search for specific text - Press
tto switch between journald and daily log files - Press
wto toggle line wrapping
Service Control
Section titled “Service Control”From the dashboard, you can control any service:
- Start/Stop — Toggle the service state
- Restart — Stop and start the service
- Remove — Uninstall the service (keeps data by default)
The TUI shows dependent services and handles them automatically. For example, stopping a node will prompt about dependent bakers.
Unmanaged Instances
Section titled “Unmanaged Instances”Octez Manager automatically detects Octez services running on your system that weren’t installed by octez-manager:
- Systemd services (e.g., manually configured octez-node units)
- Standalone processes (Docker containers, tmux sessions, manual launches)
These appear in the Unmanaged Instances section at the bottom of the dashboard with real-time metrics.
For systemd services, you can:
- View status and metrics
- Start, Stop, Restart
- View logs
- Import to Managed — Convert to a managed instance
For standalone processes, you can:
- View status and metrics (read-only)
Importing External Services
Section titled “Importing External Services”To bring an unmanaged systemd service under octez-manager’s control:
- Select the unmanaged instance
- Press
Enterto open the action menu - Choose Import to Managed
- Follow the import wizard
The wizard will:
- Detect the service configuration automatically
- Let you choose an instance name
- Offer Takeover (disable original) or Clone (keep original running)
- Preview changes before applying
After import, the service appears in your managed instances with full control.
Installing a Complete Shadownet Setup
Section titled “Installing a Complete Shadownet Setup”Here’s a typical workflow for a complete Shadownet baking setup:
-
Download Octez binaries (optional but recommended)
- Press
bto open Binaries page - Download the version you want to use
- Press
-
Install a node
- Network:
shadownet - History mode:
rolling - Binary: Select your downloaded version
- Bootstrap:
Snapshot
- Network:
-
Wait for sync — The dashboard shows sync progress
-
Install a DAL node (optional, for DAL attestations)
- Connect to your Shadownet node
-
Install a baker
- Connect to your Shadownet node
- Add your delegate address(es)
- Optionally connect to your DAL node
-
Install an accuser (recommended)
- Monitors for double-baking

Diagnostics
Section titled “Diagnostics”Press d from the main dashboard to open the Diagnostics page.
This page shows system-level information useful for troubleshooting:
- Service states — Overview of all managed services and their current status
- Background queue — Sparkline showing background task queue depth over time
- System metrics — CPU and memory usage trends
- Metrics server — Address of the Prometheus metrics endpoint (if enabled)
The diagnostics page is read-only and refreshes automatically.
Keyboard Shortcuts
Section titled “Keyboard Shortcuts”| Key | Action |
|---|---|
↑/↓ | Navigate list |
Enter | Select / Open action menu |
Tab | Fold/unfold instance details |
b | Open Binaries page |
d | Open Diagnostics page |
? | Show help |
Esc | Go back / Close modal |
q | Quit |